My Newborn Essentials

I feel like I have a small avalanche of new babies in my circle of friends. Since I like inflicting my opinion on everyone, I thought I’d share some stuff that I came to appreciate in the early days of bleary mommy-hood.

Eat Sleep Simple Baby Tracking app – In the first few weeks of life you will have fairly frequent well-baby check-ups with the pediatrician, where you will be grilled with a series of rapid fire questions involving everything from the number of poops and pees per day to what the sleeping situation is and which direction your carseat is facing. It feels like a pass/fail sort of test. This app helped me a lot in order to keep track of things, because I had about 2 functioning brain cells due to sleep deprivation. I mostly used it for keeping track of eating, how many minutes on each side and how frequently. My iPhone and my Boppy were my constant companions.

Halo Sleep Sack – I was all about the swaddling. Cora… not so much. She wouldn’t fuss when swaddled, she would just do a little Houdini move and her arms would wiggle free in mere moments. We had a few different kinds of things, from the nice Aden & Anais muslin blankets to the Miracle Blanket. The most fool-proof swaddle was the Halo Sleep sack. There is a zipper in front and two flaps on the arms on the side that can velcro together, with the option to hug arms to the body in a swaddle or leave it loose around the body to let those baby arms wave in the air. The zipper offered easy diaper access without having to completely unbundle her. Next time I need to swaddle somebody I’ll go straight to one of these. So, so easy. Plus even if your lil bugger isn’t into the swaddling it is a nice wearable blanket that can’t be kicked off or wiggle up in front of the face.

Fisher Price Newborn Rock N’Play Sleeper – Cora slept in this for the first three months. It is super lightweight and small, so I kept it right next to my bed. It was easy to drag around the house too (or pick up if you’re able and less lazy). I loaned it to a friend later who had a preemie with some serious reflux issues, and she said it was a lifesaver. The angle of the seat helps newborns with those uncomfortable regurgitation issues. I just saw there was a recall on these due to the potential for mold to grow in them. Well duh, if they get wet and gross and you don’t clean it and let it dry, I see how that could happen. Same with a carseat or swing or any other kind of infant seat. I always kept a waterproof pad like these in the rocker in case of diaper leakage to protect the seat. I also keep one on the changing pad so if there’s a mess I can just switch one of these out real quick rather than washing the whole changing pad cover. Easy peasy.

Piyo Piyo Nail Scissors – love these little guys.  I’ve never hurt her teeny fingers with these, and cutting baby nails is a tricky operation since she has a proclivity to flailing all her limbs, sometimes simultaneously.  (Best to cut those nails when baby is unconscious, whenever possible).  I’m only sorry they don’t seem to work on my cuticles.  

Boppy – The nursing mom’s best friend.  Its a pillow that hugs you back! Also when the bebe is teeny it makes it comfy and easy for anyone to hold that lil bundle.  Later you can use it to prop the baby up when he is working on those sitting skills.  I didn’t think much about the one I registered for.  It had a green cover and I thought that was fine.  What I didn’t consider was how much I would be living with this thing.  In the early days you’ll take a lot of photos with your bebe’s head resting on that Boppy.  I also realized the pale green pillowcase clashed horrendously with my dark red couch.  As it so happens, I would love to just get a new couch, but the more cost effective and practical option at the moment was to find a Boppy cover I actually liked.  Boppy makes them of course, but I wanted a little more variety, so I turned to that mecca of all things cute and crafty – Etsy.  Search for Boppy covers on there and you’ll find tons, I went with this store BixbyBasil because of the pages and pages of cute fabric options.  I probably could have bought a dozen just because there are so many great fabric choices.  With any baby gear that has a decorative element, I say go with something an adult would like looking at too.  If there’s any colors or patterns, the baby will like it.  I chose this one.  Cora loves it too.  A Boppy cover is an easy DIY too, if you have any skill with a sewing machine. I have no skill with a sewing machine and I was able to make a Boppy cover for a friend following a tutorial and with some supervisory advise from my mom.

Swing – I did not want a swing. I thought it would be a “sleep prop”. After 6 weeks of 45 minute naps, I caved and took the swing my parents had purchased (link above). The 45 minute naps now lasted about 2 hours. Hallelujah. The swing was big and tacky and I kind of hated the sight of it, but I really needed those two hour naps. The weird thing was Cora slept fine in the rocker/bassinet at night but that didn’t work for naps for some reason. She napped in the swing until she started to outgrow it and started sitting up in it while it was swaying, so at around 6 months old I started working on napping in her crib (where she was already sleeping fine at night). The nap transition took a while, but it happened … eventually. At one year old she naps in her crib like a champ. Though it was essential in the beginning, I was glad to move that big tacky swing out of the nursery and out of sight.

Netflix – I watched SO much Netflix in the first couple months following Cora’s birth. Mostly because nursing sessions last about 40 minutes during that newborn time, conveniently the length of a show on Netflix (or two shows if its a 20 minute sitcom). I would get really bored sitting around all the time, so watching endless tv was one of my few available hobbies to keep me entertained. Find a few shows you’d like to burn through several seasons of and go for it.

What are your must-have, lifesaver newborn items?
 

Down with the Sickness

(oh wah ah ah ah!)

Alternate Title – How Not to Get Fat During Pregnancy. 

For the first 3-4 weeks I felt normal.  Then, it came.  The nausea.  The awful, powerful urge to throw up every 30-45 minutes.  All day long.  Morning sickness is a complete misnomer.  My nausea was 24/7.  Nausea is worst on an empty stomach, therefore you are more likely to feel sick in the morning because you haven’t got any food in you yet. 

I didn’t throw up a ton, largely due to sheer willpower.  I really really Really hate throwing up.  Its the worst thing ever.  If you’re sick or hungover, you at least have the knowledge that getting whatever it is out of your system will help somewhat, so the barfing is a good thing and soon you’ll feel better.  With pregnancy?  Not so much.  That sickness could stay with you an indeterminate amount of time, and no amount of yakking will make it go away.  It was also such a struggle to get food in my mouth in the first place, I didn’t want to waste all that effort by urping it all back up again.  So I’d just say no, No, NO.  I will not throw up.  There were some mornings (does 1am count as morning?) when there was no stopping it.  My entire body convulsed.  I wouldn’t have been surprised if blood was shooting out my ears and nose and my eyeballs popped out.  Like the hand of God Himself was squeezing me like a tube of toothpaste.  No mere willpower was keeping that at bay. 

Then there’s all the inappropriate times and places to throw up, which is almost all places almost all the time.  Like, in the mall parking lot at 6pm.  Or in the bar where you went to hear a band play (not drunk!  just pregnant!  I swear!).  Or driving up I-85 at 70 miles per hour on the way to work.  (Would I be able to safely pull over?  Then I would have to drive all the way home to change my clothes?  Ewwww).  I did manage to keep all the barfing confined to my bathroom.  Ok, and bedroom floor one time.  Annnd the living room floor a couple times.  And one little time at the office, but I’ll leave that a mystery for my co-workers. 

For a month I lived like that, feeling like I had a 24 hour stomach bug (720 hour bug?).  The next time I went to the doctor I whimpered about how ill I felt All The Time and she gave me a prescription.  It helped Enormously.  I kept getting that prescription refilled well into month 5, though at about that point I did start taking it as needed rather than automatically every morning.  I still felt queasy pretty often, but it was much easier to get small amounts of carbohydrates into my mouth.  The nausea never really left me, but was eventually replaced with reflux when my stomach was shoved somewhere up into my chest cavity.

Not only did I feel ill, but my desire for food changed. The joy of food was lost.  And I love me some food.  My taste buds had changed so that almost all foods were repellent to me. I didn’t have any specific aversion, it was a broad spectrum.  Like all meat was disgusting.  Salad became hard to eat.  What’s gross about salad, you say?  Nothing, that’s just an example of how All Food was completely unappetizing.  You know what helps to alleviate the nausea?  Food.  So the stomach that hated all foods also needed food to combat the sickness, so it was a conundrum. For about a month I survived by shoving a Fig Newton in my mouth every time a new wave came on, which was approximately 30-45 minutes.  Christie theorized that I was the sole reason for Newtons going on sale at our local Publix.   

Bread and other carbohydrate cousins were usually ok, given that they were bland, and low in fat and sugar.  Saltine crackers and ginger ale were not some of these foods.  Another odd symptom that I had never heard of was a bad taste on my tongue that never went away, despite scrubbing it with a toothbrush (trying not to gag).  It was like I had been sucking on pennies all day long.  Anything sweet just made the taste worse rather than covering it up.  This included refined wheat products like saltine crackers, and sugary drinks like ginger ale.  Both left a horrible after taste.  I did discover that club soda with just a teeny bit of real soda in it was good.  So refreshing and bland. 

After checking out BabyCenter I realized I was not alone in the bad mouth taste thing.  Not much helped cover it up, except for these ginger candies sold at Trader Joe’s.  The difference between this and ginger ale is that it is Real Ginger and doesn’t have a lot of added sugar.  If you bought a jar of thin sliced ginger, the kind always served in a little lump with sushi, that would do the trick too.  But the candies are easier to keep in a desk drawer or purse. 

Foods that Helped Me Survive:

  • generic Cheerios (name brand honey-nut tasted too sweet, so go for generic or a variety with less sugar)
  • Chex mix or trail mix
  • Peanut butter.  Eating a spoonful made me feel better pretty quickly.  Pair with an apple or banana, or smear on the Newtons or Fiber Bar if you feel like saving yourself the shame of eating it straight from the jar with a spoon. 
  • Real ginger – emphasis on real.  Not a food source, but it helps the palate
  • Barely flavored beverages like club soda or La Croix.  I became addicted to Honest Ade because it was tasty without being too sweet.  My faves are Super Berry Punch (I think that’s the one with a berry wearing hipster glasses on it) or the Orange Mango. 
  • Milk.  I was practically vegetarian, but I drank milk like a fiend.  Which is good, because if you don’t get enough calcium during pregnancy that greedy lil fetus will steal it from you.  Just say no to osteoporosis. 
  • Quesadilla with black beans.  This was later on when I could handle a little more fat content from the cheese, and the beans made me feel like I was at least getting some protein.
  • Smoothies.  I didn’t do this a lot, but they kept me going at Dragon Con very well when I was 5 months preggo.

Talking to other preggos, I wondered about my protein intake since it was being fueled solely by milk and peanut butter.  I asked my doctor if I should try to drink some protein shakes.  He said, “Why would you want to do that?  Those are disgusting.”  Granted I had an older doctor who had been practicing for 30 years.  Here’s where opinions vary widely, but in my case my very unbalanced diet resulted in a healthy 8 pound baby.  I did take my vitamins with no problem the entire time.  I used VitaFusion PreNatal Gummy Vitamins.  They never tasted bad, so that’s saying something.  They don’t have iron, so I took just a normal iron vitamin, but always a couple hours later so that one didn’t interfere with the absorption of the other.  The iron became pretty important around month 5.  I had a few days where I felt like I was going to pass out, and taking iron really helped with that.  Passing out – no bueno. 

So glad I’m not there any more!  Feel free to share your horror stories or what helped you survive!


Congrats!

Pregnancy.  It started out with a weird stomach/ back ache that kept me from sleeping for a few nights.  Once I found out what back labor was I realized it was very similar.  I couldn’t lie down without a deep ache ringing around my entire lower abdomen.

It was so early on that the hormone levels weren’t high enough to register on the usual pee test.  I’d seen the general practice doctor and they drew some blood to make sure.  Blood tests are way more sensitive and can detect the hormone (HCG) before those home kit tests.  I got a call on a Saturday morning from the GP with the news that yes, I was pregnant.
I wasn’t happy.  I was sad and worried.  This amount of discomfort wasn’t normal from what I’d read, and the GP was concerned it could be ectopic.  And if that were the case, I wasn’t really pregnant at all.  More blood tests over the next week tracked the HCG levels.  If they went up, I was really pregnant.  If they stayed the same, I was looking at an ectopic pregnancy or miscarriage situation.   Hence the worry.  However, the worry was needless as the hormone levels went up appropriately and an ultrasound showed a little splotch right where it should be.  Hello little dot!
For the first trimester, I was cautious.  I was afraid to be happy or excited because I knew that miscarriages are actually pretty common.  It took a long time to feel real.  There was no instantaneous moment when I felt like I knew for sure there was a tiny person bopping around in there, but more like a gradual dawning.  By the seventh month or so when my entire stomach was doing a dance I had pretty much come to grips with the concept.

When we found out the gender, we were thrilled.  After the ultrasound we sat in the waiting room at the doctor grinning like idiots.  I was shocked, because I was convinced it was a boy.  Most people guessed boy.  Most people were wrong.

Goodwill Finds

While shopping for formal wear at Goodwill, I found some other great stuff by cruising through the housewares.  And I snatched it up for $1 – $2 a piece before Christie could get her hands on it.  Hahahaha (triumphant laugh).

I realize these knick-knacky items are what my mom would call “stuff to dust around”.  Hi mom.  But I’m a sucker for colored glass and low, low prices, so I splurged on this slightly-less-than-useful stuff.

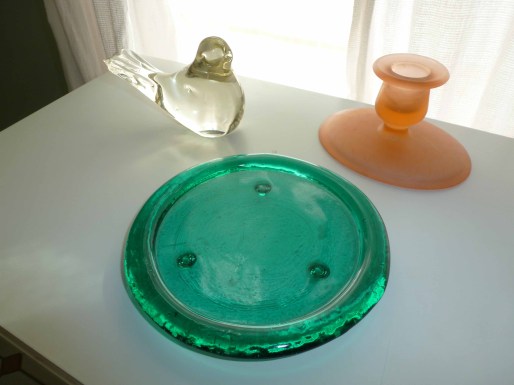
Its a candlestick, a bird, and a … another candle holder?  For a pillar candle?  Yeah, that must be it.  Its about the right size, maybe a little bigger, than a pillar candle.

This has a subtle feather pattern around the base, and unlike the other pink glass I have, it has a frosty finish.

Tweety here is a little chipped around the edges, but he is pretty nonetheless.

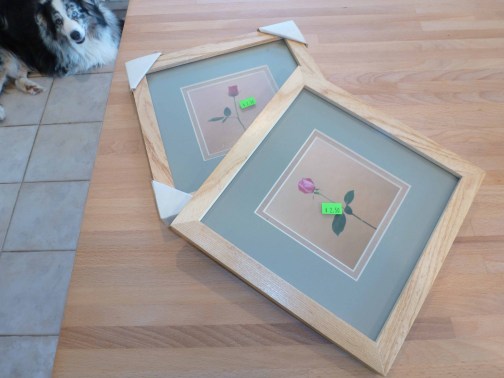
I also found some picture frames next door at the Habitat for Humanity Re-store next door to Goodwill.  I can Never find square frames that are the right size, so I jumped on those like a trampoline.  I have a few 6×6 inch cards that I’ve wanted to frame, but Ikea square frames are a little too small.

A coat of spray paint and voila.  I also turned the mats backwards to use the white side.  The mat hole wasn’t big enough for the cards, so I just put the cards in front of the mat.  Not really kosher, but who’s going to notice.

The sweet little lamb photo is from Yes and Amen on Etsy.  The phone booth drawing is a Christmas card from a co-worker in London, and I think it is simply adorable.  I love British things.

If you were wondering why I was shopping for formal wear at Goodwill… here is why.  Don’t be scared.

I wanted a costume for Run for Your Lives (a zombie-infested 5k obstacle course).  Yep, we dressed like zombies and chased mud-covered runners in the woods for 3 hours one Saturday afternoon.  What do you do with your weekends?  Something normal?

Staying Alive (in my yard)

The weather has been a-mazing, so we’ve been attempting some yardwork.  Full confession: we’ve been paying for yard help, and let me tell you, it is a world o’ difference.  Our awesome yard guy is a friend of Chris’s who needs some extra work, and we’ve got plenty to give him.  And it saves me the agony of trying to deal with weeds, and the resulting spiral of anger (“curse you weeds, go back to the abyss from whence you came!”) and despair (“I’ve been out here for 2 hours and it looks the same!  whimper”).

But here is my small contribution.  Last fall, this patch of what you might call a flower bed looked like this:

Where does the grass end and the bed begin?  Hard to say.  And one of the rosebushes was nothing more than angry spikes of extremely thorny wood sticking out of the ground.  Here it is after being tilled and the roses are getting leafy and not so angry.

Yeah, mostly dirt, but it freed up a clean space to put in some more lambs ear!  I love this stuff.  We inherited a patch in front of the porch, and it has been very happy in the moderate rainy weather.  Its so happy that it has been spreading out of the patch and launching brand new plants in nearby spots in the yard.  I popped these out of the random places they were growing apart from the bed, and stuck them in the ground hoping they will flourish and continue to make babies.  Right now they are looking a little squashed, but I’ve been watering them and they perk up in the morning and evenings.  Here’s hoping they survive.  Here’s the happy thriving bed that spawned these other big guys I transplanted:

Its so soft, I like to sit there and just pet it.  Ok, I don’t really spend much time doing that, but if these survived in a pot I would keep one at my desk and pet it throughout the day.  When I tried putting a little bit in a pot once it didn’t last long. Hang in there buddy!

Another set of  survivors, are my window box mums.  Here is what they looked like in the fall:

For a while this winter they looked like a pile of dead sticks.  No green.  I took some scissors and snipped down the dead parts to give new green growth some space.  And now:

Ta-da!  Green!  Wait, what’s up with the lil guy on the left?

Tiny Tim here is lagging behind.  All of them looked like this in the winter, but this one is way behind on the new leaf production.  Not sure why since I treat them all the same.  But then DLF Christie noticed something about one of the big fat mums:

BUGS.  Little black bugs coating the stems.  Ewwww.  I googled and somebody recommended mixing dish soap and water and spraying it all over the plants.  It will get rid of the bugs and not hurt the plants.

It isn’t green cleaner, I just re-used the bottle.  I thoroughly sprayed all three mums, just to be safe, every which way.  The bugs did not seem disturbed by the soaking in soapy water.  They didn’t move, actually.  Maybe they died silent little deaths, or will leave later.  I sure hope so.

Hang in there everybody… except for the bugs, you need to vacate or die asap.  Thanks.

Pinterest Challenge – Dip Dye Pillow

According to the experts, it is Pinterest Challenge time again!

Yeah, I wrote about my pillow dyeing experiment the other week.   BUT!  Then I saw a tutorial for dying dyeing and pinned it, thinking I would give it another try.  See, I was a little disappointed with the saturation of my pillow.

It looked like this:

When I wanted it to look like this:

My pillow was not bright and bold, it was pale.  And it didn’t have that two tone effect with the dark blue and light blue.

So I found this tutorial just after my pillow-dyeing attempt.  There were 2 big differences here – it says to let your fabric soak in dye for 2-3 hours, where I had just soaked my pillow for 45 minutes.  It also says specifically to use the powder dye, and I had used the liquid dye.  Here’s what the result of the tutorial is supposed to look like:

So I hit up the Hobby Lobby once again, bought the powder dye in teal, same color as before.  Then I dumped the entire package of dye into about 1 gallon of hot water.  This is not per instructions and is way more than you are supposed to use – it is supposed to be one package in 3 gallons of water.  This is my third attempt to dye something and I’d never been satisfied with the saturation, I thought I would go crazy and see what happened if I over-dyed (once before I tried to make a blue tank top black, but it ended up gray).  I added a half cup of salt to the dye too. Oh look, the directions also say to pre-dissolve the powder in 2 cups of water.  Why do they print these directions so tiny?  I did stir it up a bit with a paint stick before dipping my pillowcase in.

I let most of the pillowcase soak in the dye for about an hour.  Then I pulled part of the pillowcase out so only the lowest part was soaking in the dye for another hour.  At the end of 2 hours I rinsed it a bit and then threw the pillowcase in the washing machine because it was taking soooo long to rinse all that dye out.  I’m lazy.

Result:

Nope, I still didn’t get that 2 tone look.  Not even close.  I don’t know why it got blotchy like it did, maybe because I didn’t make more of an effort to fully dissolve the dye powder.  And you would never know that the bottom third soaked an hour longer than the middle third.

It did get the smeary part at the edge.  Like tie dye.  I thought tie dye was cool once.  In 6th grade.

Here it is chilling on the windowseat.  I’m not sure how I feel about it yet – is it better than attempt #1?  Worse?  Or just a different look?

(Hey Susie, if you’re reading this, Ahmed said “that’s a cool pillow”.  So it has received one dude vote.)

DIY Sea Glass Bottles ~ Fail

I’m looking at a craft fail here my friends.  This the tutorial that I re-pinned.

Here are the materials needed according to the tutorial:

  • Blue & Green Food Coloring ( I used the Neon colors from McCormick just because I like how intense the color is)
  • School Glue
  • Dish Liquid
  • Water
  • Paint Brush
  • Glass Jars, Bottles, etc.

And the instructions:

  • Mix the school glue and water as if you were making homemade mod podge.  WHAT?  You don’t know how to make your own mod podge?  So easy!  Just mix 2-3 parts glue to 1 part water.
  • Add a few drops of blue and green food coloring.  Add more blue or green depending on your preference.
  • Add just a little dish liquid.  How much is just a little…well, not too much!
  • Blend well.
  • Now, carefully paint the mixture onto the outside of the glass and let it dry.  Watch out for being too streaky or leaving drips.  Don’t worry, if you mess up – just wash  and start over.

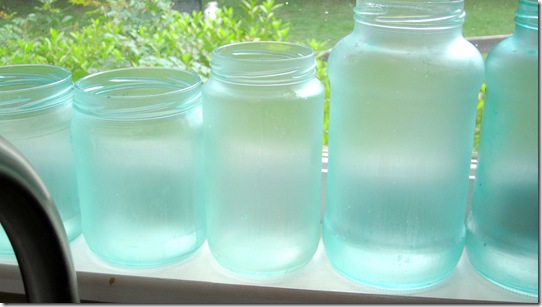
The end result should look like this:

See how they are brightly colored, yet have a frosty finish, but are still translucent?  And you know what she said about not getting streaks or drips?

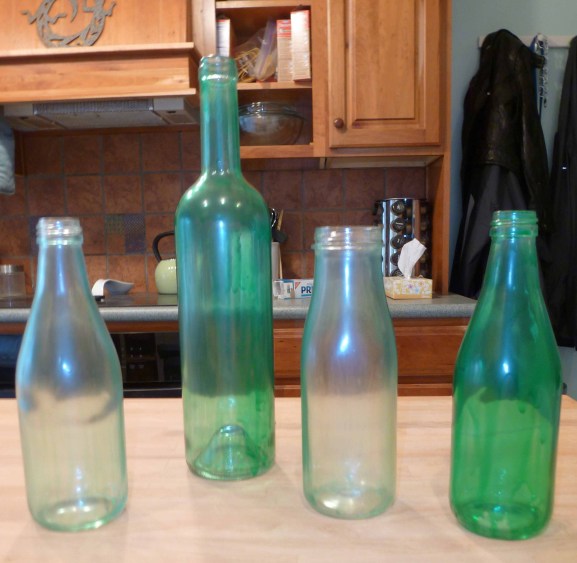
Yeah, I couldn’t accomplish that.  I bought exactly the same food coloring.  I tried mixing glue and water, making a thick version and a more watery version.  The more watery version definitely dripped everywhere.  But a thick version dripped too, just in slower bigger globs.  I tried a few different brushes, from a tiny one to a sponge one and finally settled on a 2″ brush because that got the job done the fastest and was easiest to coat it without lots of brushing (meaning lots of brushmarks).  I didn’t mix in much dish liquid, just a tiny bit.  I also only used a few drops of food coloring.


From a distance they are ok, and even the photos are alright.  But in real life, up close, they don’t look so hot.  Not hot enough to say, display on a table or a shelf, or put out during a party and say “look what I did”.

See the drippy mess?  But I was hopeful with a nice, even, opaque coverage on the wine bottle.

I had really good coverage on this one too.

Once they dried, I was underwhelmed.  The blue is so faint that it just looks like regular glass that has that green tint around the edges.  The green is really strong, but up close it is drippy.  And this is a pretty normal color for glass anyway, but it isn’t frosty.

See the drips on the green bottle?

I’ve tried this two more times since with real Mod Podge and more food coloring to try and get the blue to show.  I tried it with and without the dish liquid.  None of those turned out any better, and the brushstroke problem just got worse. So I think I am officially giving up on this one unless someone has a solution.  Sad face.

Bohemian Style ~ Part 2

More Bohemian style!  Here’s an intro from yesterday’s post to catch you up:

The bohemian aesthetic conjures up a romantic notion of a free-spirited yet somewhat impoverished life dedicated to art and wanderlust. So let’s look at some pretty pictures to see the building blocks of our modern concept of bohemian style.

I’ve come up with 6 main elements that seem to come up again and again whenever I spot something that appears decidedly bohemian in style:  Bright Colors, Patterns, Aged or Antique details, Global pieces, Nomadic influences, and an overall Eclectic design.  Naturally lots of these go hand in hand or overlap, but the more I looked at photos I realized that they all come in to play… keep an eye out for how many of these elements you can identify in any given photo.  If you want to see more of anything or the original source, click the photo.

Global

Mixing your continents gets you feeling bohemian pretty quickly.  If you walk into World Market you’ll see heavy influences in textile patterns from India, collections of various Buddhas from across Asia, and a splash of Central Asian suzani in the throw pillows.  Its easy to get pretty extreme since there are so many beautiful things to choose from, but I like to balance out design objects from different continents so that my home doesn’t end up looking like a hibachi restaurant due to all the Japanese items (for example).

This fabulous bedroom can be found in Morocco.  It is definitely high drama with classical Moroccan design elements in the hanging lanterns and elaborately detailed patterns on the ceiling, the textiles, and carved wood in the doorway arches.

If you don’t live in a Moroccan palace, you can still incorporate bed canopies and floor cushions.  This is my favorite nursery tour to date.  The floor cushions in beautiful prints, the cute stuffed camel, and even the subtle arches in the crib all quietly point to the Middle East without feeling like you walked into a bazaar.

If you think this wall hanging looks familiar, its because identical fabric was in one of the photos from Bohemian Style ~ Part 1 in the form of a headboard.  These Mexican coverlets are called tenangos, you can find more here at lavivahome.com in more beautiful colors.  The room maintains a clean, modern aesthetic in the furniture.

A little bit of India in jewel tones and patterns.  The elaborately painted side table is a creative way to bring in a pattern without relying on fabric.

Nomadic

The romantic idea of gypsies (again, not referring to any actual people group) involves a lot moving around and living in non-permanent structures.  Draped fabric can come in the form of a bed canopy, a wall hanging, or a cozy nook in a mini indoor tent.

Hanging fabric can create walls in a large open space like a loft or an outdoor patio.

Piles of luscious pillows are also prevalent in bohemian design, making any surface seem cozy and inviting.  Pillows make for easy to carry lightweight furniture, and are easily stackable in a corner when not in use.  This looks like a pile of large floor cushions, but its actually a sofa by designer Roche Bobois.

Moroccan poufs have been used in very glam settings lately.

Looks so comfy and plush…

Eclectic

If you like it, use it.  That means any found object can have a place in your home, and feel free to mix styles from the across the world and different centuries.

Birdcages in the bathtub?  Why not?

The sofa and walls are fairly contemporary, but the layered rugs and weathered industrial table make the room interesting.

This loft is a blank canvas full of beautiful things.  I love this oversize quilt that can be used as a room divider.  Check out the modern art with the black tufted sofa, the granny lamp, and those Moroccan style poufs again.  Oh and a cow hide rug, because, why not?

In conclusion – there’s a lot of gorgeous stuff out there. Go find what you love and bring it home, let things evolve naturally over time. There’s a ton of ways to do bohemian, but throw in some of these elements and you’ll be on the way.

Bohemian Style ~ Part 1

A while ago, this article on Apartment Therapy addressed some elements in Bohemian style in the form of furniture. I’ve been thinking about what really makes something “bohemian”, as far as we understand that word today.   That means that this post is not in reference to the current day Czech Republic, which is where you would actually go if you wanted to find the original Kingdom of Bohemia.

According to Urban Dictionary, the term “bohemians” , or artists/poets of 19th century France, were simply called such because the French incorrectly assumed that gypsy people (the correct term for gypsy would be “Romani”) came from the Kingdom of Bohemia. Romani people actually have a very long history going all the way back to India if you care to read more about it.

All convoluted misnomers and ethnographic history aside, the aesthetic does conjure up a romantic notion of a free-spirited yet somewhat impoverished life dedicated to art and wanderlust. So let’s look at some pretty pictures to see the building blocks of our modern concept of bohemian style.  I’ve come up with 6 main elements that seem to come up again and again whenever I spot something that appears decidedly bohemian in style:  Bright Colors, Patterns, Aged or Antique details, Global pieces, Nomadic influences, and an overall Eclectic design.  Naturally lots of these go hand in hand or overlap, but the more I looked at photos I realized that they all come in to play… keep an eye out for how many of these elements you can identify in any given photo.  If you want to see more of anything or the original source, click the photo.

Colorful

Rich, bright, even jewel-tone colors to be exact. This could mean a focus on one bright color, like this fabulous hot pink India-inspired sunroom:

Or this amazing bright teal bathroom:

Or lots of bright colors squeezed into one space. This living room is dominated by blue and green, but some orange, yellow, and pink come in through the pillows and art.

Aged

Boho means finding old things. Starving artists have to scavenge and re-use other people’s castaways. Older, worn furniture has a sense of history, and the patina of tarnished metal, chippy paint, or a threadbare rug adds depth and interest. Distressed paint finishes are very popular these days, as you might have noticed. Paula Mills found this antique fireplace mantel at a thrift store. Check out her entire house tour on Design Sponge, its all very bohemian.

This room also meets the boho qualifications with the old trunk, the oriental rug, the collection of colorful patterned quilts stacked in the old crate and basket, and the old mismatched mirrors on the wall. I’m assuming she doesn’t use the fireplace because it is full of books.

If you’ve ever seen an Anthropologie catalogue, you’ve seen some majorly distressed walls.  Click on the photo to see a small Apartment Therapy roundup of distressed walls and readers’ entertainingly strong opinions about this look.

Its not just about being distressed or chippy.  Antique furniture usually has a lot of intriguing curves and old world appeal.

This room has a subtly distressed wall and an antique sofa in two fun fabrics.

Patterned

Oh what a world of patterns we live in.  Geometric kilims, swirly suzanis, groovy ikats, fancy damasks, country florals, and an entire world of folk embroidery… human beings like some patterns.  Textiles are an art all their own.  As long as the colors get along, you can actually get away with mixing a lot of patterns all at once.  A true bohemian needs at least one patterned textile in every room of the tent, if not a dozen.

This lush little patio gets a break from all the green with a pink oriental rug and comfy pillows on the chair.

A little collection of quilts from Paula’s house that we saw earlier.

Mexican tapestry covers this headboard.  From this shot, it looks to be a pretty plain Jane bedroom until the fabulous headboard steals the show.

Skewed kilim rugs layered with the Moroccan-style poufs balance out the white walls, bed cover, and curtains.

Floral, floral, and wait… more floral.  I think the navy walls keep it modern (plus the headphones and camera smartly added to the wall) and pulls it away from going down granny chic lane.

Had your boho fill?  Good, me neither.  I’ll be back with more bohemian goodness later this week.